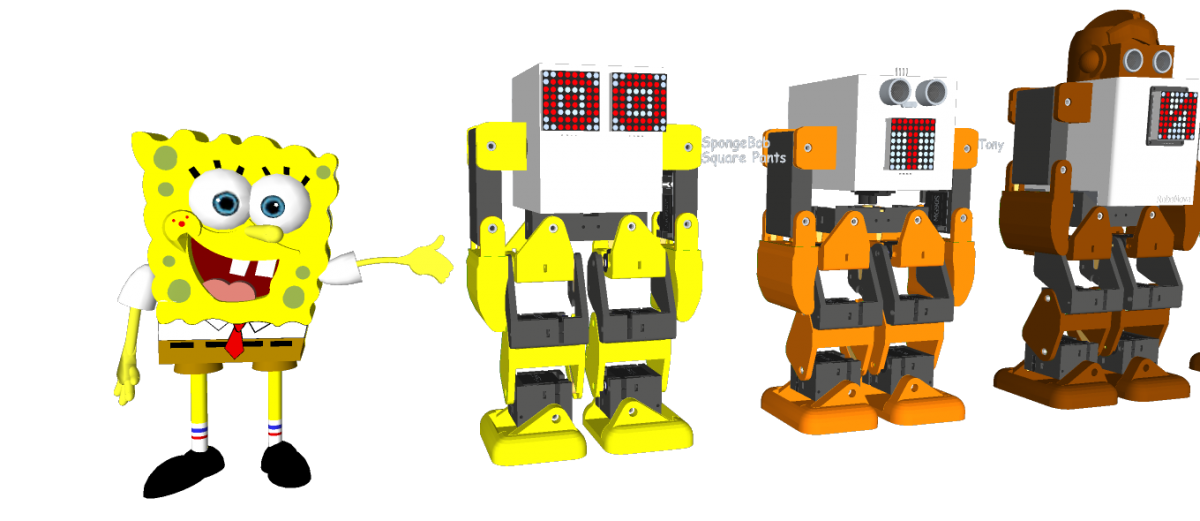
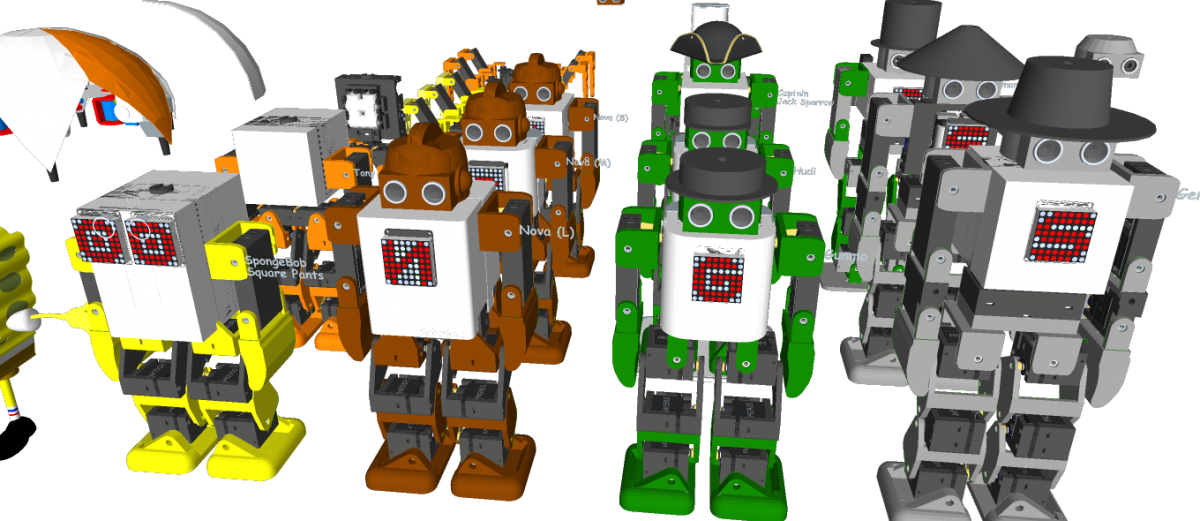
Robonoid is small sized bipedal walking robot The robot has 17 or 19, 24 freely moveable joints and servomotor in order to provide for a range of action and stable movements. Since it’s small in size, Robonoid can balance well and cope with basic movements such as walking and getting up. Also, intricate movements like roller skating and skateboarding are possible.
Robonoid is a wireless controllable robot You can control it by WiFi protocol through your PC and Smartphones. App for android and iOS are an especially intelligible UI. By using it, complicated operations can be controlled more easily.
Robonoid is a friendly robot Robonoid was named indicates a “simply shaped robot” that everyone imagines. Robonoid was designed by pursuing a simple appearance and simple functionality.
PSY – 135.7mm(W) x 258.39mm(H) x 100mm(D) – 17DOF
Jack – 135.7mm(W) x 305.62mm(H) x – 92,48mm(D) – 22DOF
Gentleman – 135.7mm(W) x 341.22mm(H) x – 78.5mm(D) – 22DOF
Tony – 135.7mm(W) x 265.5mm(H) x – 100mm(D) – 18DOF
SpongwBob – 135.7mm(W) x 230.0mm(H) x 100mm(D) – 16DOF
Hudi – 135.7mm(W) x 251.4mm(H) x 87mm(D) – 19DOF
Gunmo – 135.7mm(W) x 259.3mm(H) x 78.5mm(D) – 19DOF – https://youtu.be/qIZJZDcRpVw
Nova – 135.7mm(W) x 282.8mm(H) x 100mm(D) – 17DOF – https://youtu.be/kzfyKRzp_9I
Hexapod S1 – DOM 352.83mm(WD) x 193.16mm(H) – 20DOF
Robonoid is a Plen/mini-Plan/RoboHero robot derivative designed at Zalophus DesignHouse. We love the Plen2 robot but its want to new design. This is our take on a new lower cost version of the Plen2 robot using MG90S/ES08MA-II/SG90 servo’s.
The 3D printing parts were inspired by the Plen2 components, but they were redrawn from SketchUp to use the inexpensive MG90S servo motors.
Electronic Parts
1 x WeMos D1 mini ESP8266 ESP-12
1 x PCA9685 16-channel, 12-bit PWM Fm+ I2C-bus Servo controller
1 x Shield Robonoid-20CH-R0a
1 x HC-SR04 Ultrasonic Distance Measurement Sensor
2 x 16340 or 18650 Battery Holder
1 x 2S 7.4V Lithium Battery Charger Protection Board
2 x 16340 or 18650 Batteries
2 x Snap-In Single ‘A’-‘AA’ Battery Contacts 209 [KEYSTONE ELECTRONICS CORP.]
2 x Snap-In Single ‘A’-‘AA’ Battery Contacts 228 [KEYSTONE ELECTRONICS CORP.]
1 x DC Jack and Battery Harness Cable
17/19 x MG90S Metal Gear Servo Motors
The open source Humanoid Robot – Robonoid hardware and software is free and made with love. Please show your level of support with a voluntary donation.
3D Design Tool: SketchUp Pro
Design concept: RAPIRO – The Humanoid Robot and Gundam
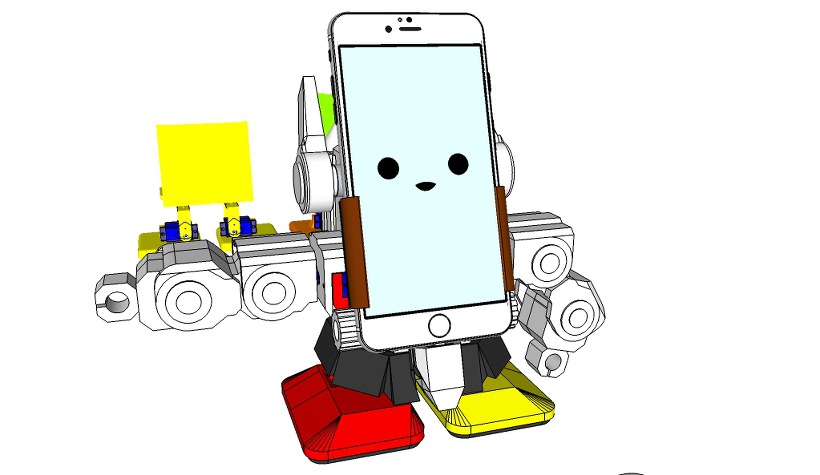
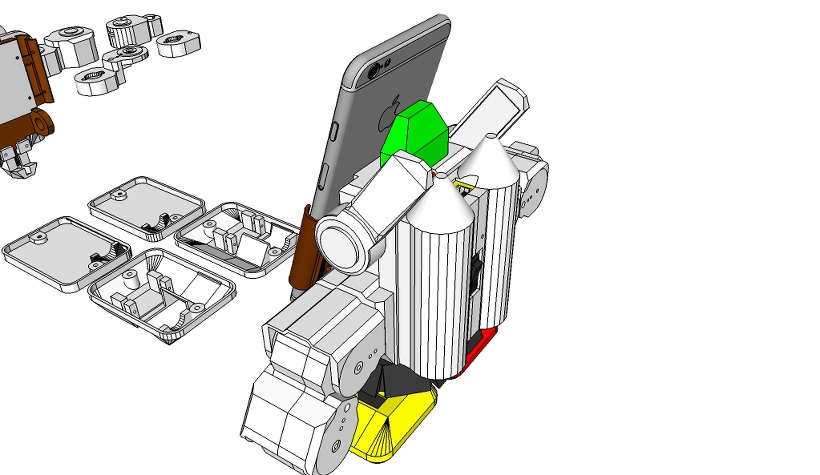
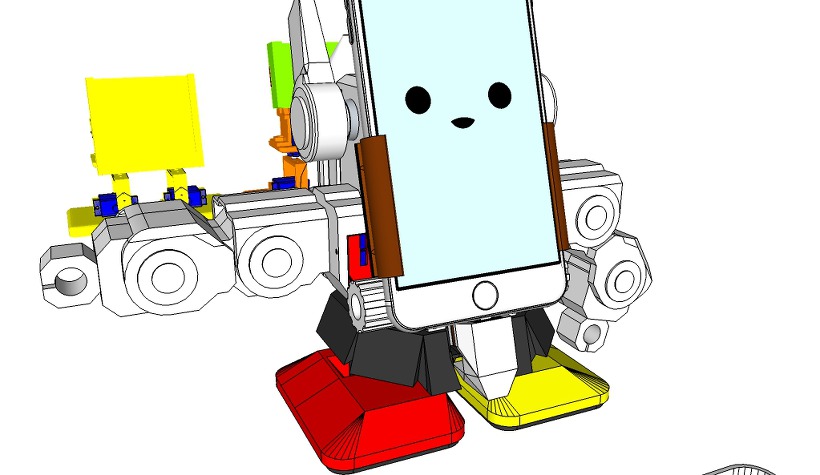
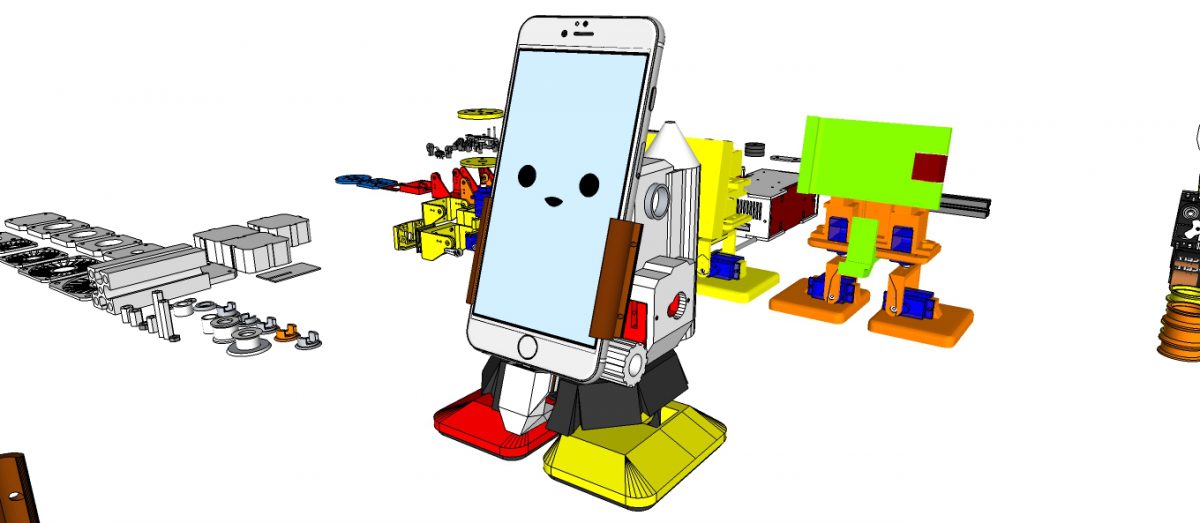
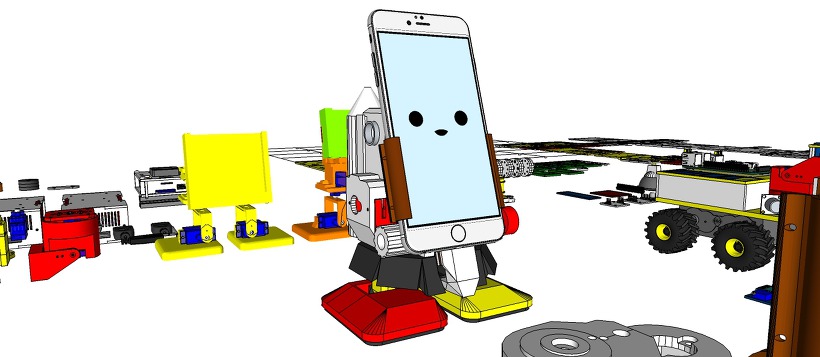
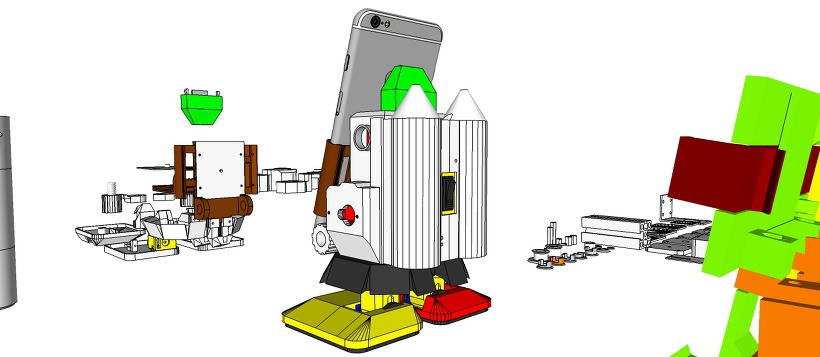
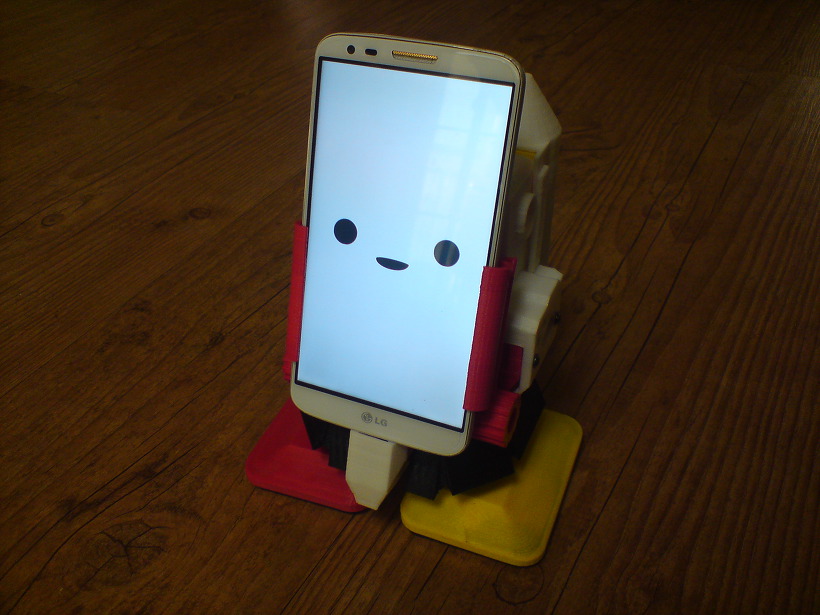
This is an upgrade version of my MobBob V2 Remix robot.
MobBob is a smart phone controlled robot. By harnessing the power of your smart phone, MobBob is a walking, talking robot with voice recognition and computer vision that you can build for around $35. I will be continuing to extend his features over time. I want MobBob to be a companion robot that everyone can afford and have fun with.
Support standard 9g servos [previously I was using Tower Pro SG90 servos]
Make everything easier to assemble [no more need for glue]
Make it easier to adapt/modify for other phones. The new bracket system made it easier to exchange a new phone / the battery holder.
Also, in my V2 Remix Upgrade build, I’m also using the Arduino Nano instead of the DIY Nano shield, so the entire build is smaller and tidier. 🙂
MobBob V2 Remix Upgrade uses the same software as the original RAPIRO.
You can find more detailed build and wiring instructions here:
…coming soon…
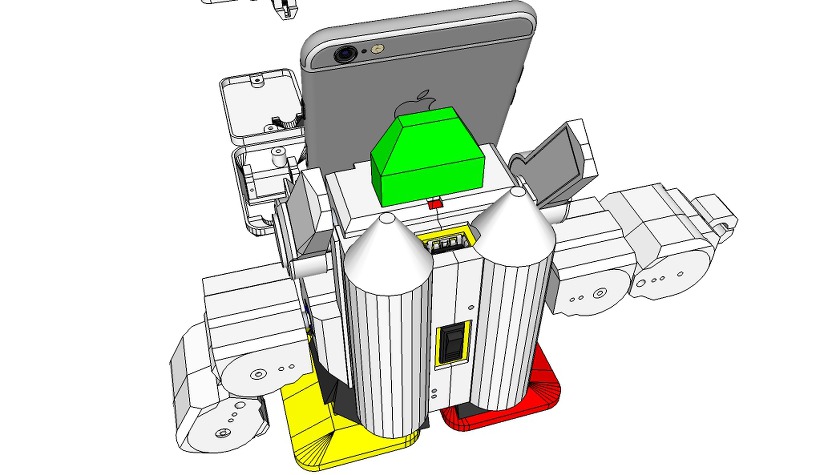
The parts that you need to print:
1 x Leg Left
1 x Leg Right
1 x Foot Left Floor
1 x Foot Right Floor
1 x Foot Left Top
1 x Foot Right Top
1 x Waist
1 x Arduino Nano Holder
1 x Phone Mount Base
2 x Phone Mount Side
1 x Phone Mount Gear
1 x Phone Mount Back Plate
1 x Phone Mount Conn
2 x Phone Mount Bolt
2 x Phone Mount Nut
1 x Battery Bank Rack [18650 x 2] or Power Bank
1 x Battery Mount Cover or PowerBank Hook
1 x Jacket
1 x Cap
1 x Hand Back Left
1 x Hand Front Left
1 x Arm Back Left
1 x Arm Front Left
1 x Shoulder Left
1 x Hand Back Right
1 x Hand Front Right
1 x Arm Back Right
1 x Arm Front Right
1 x Shoulder Right
The non-3D printed parts you need are:
6 x Tower Pro SG90 servos [for Shoulders, Arms and Hands]
4 x EMAX ES08MA II Mini Metal Gear Analog Servo [Strengthening the power of the Legs and Foots]
1 x Arduino Nano ATmega328 [see note below]
1 x HM-10 BLE Bluetooth 4.0 CC2540 CC2541 Serial Wireless Module [or HC-05]
1 x 5V Micro USB 1A Lithium Battery Charging Board [see note below]
1 x DC-DC Converter Step Up Boost Module 2-5V to 5V 1.2A
1 x Rectangle On/Off Long Rocker Switch SPST
2 x Snap-In Single ‘A’-‘AA’ Battery Contacts 209 [KEYSTONE ELECTRONICS CORP.]
2 x Snap-In Single ‘A’-‘AA’ Battery Contacts 228 [KEYSTONE ELECTRONICS CORP.]
2 x 18650 Lithium ion Batteries
1 x 300mm USB 2.0 A Male to Micro USB B 5pin + Mini B Male Y Splitter Cable
1 x Smart Phone [see note below]
4 x M3 5mm [for Foot Cover]
2 x M2 10mm [for Phone Connect]
4 x M2 5mm [for Phone Mount Back Plate]
2 x 2mm 5mm Tapping screw [for Foot servos]
2 x 2mm 8mm Tapping screw [for Hip servos]
2 x 1mm 5mm Tapping screw [for Foot servos hone]
2 x 1mm 8mm Tapping screw [for Hip servos hone and Shoulder]
2 x M3 15mm [for Jacket]
2 x M3 Nut [for Jacket]
4 x 2mm 15mm Tapping screw [for Jacket]
12 x M2 15mm [for Arm and Hand]
[Note: I got the servos, Arduino Nano, Bluetooth Module and Battery for under $30.]
Arduino Nano:
This is a small, Arduino compatible ATmega328 board with DIY extension board. MobBob V2 app connects to the Bluetooth module using its Bluetooth LE service. The app to support other Bluetooth cards.
Battery Extender:
You can use other batteries that provide 5V with a steady current. If you use other batteries, you may need to adapt the battery rack for your battery’s size.
Use 18650 Lithium Battery Charging Board With Protection Charger Module and Step Up Boost Module 3.7V to 5V for Smart Phone http://www.thingiverse.com/thing:1235749
Smart Phone:
You can use other Android Smart Phones with This app.
You do not need to adapt the size of the phone holder for your phone. The app has been successfully tested with Nexus and Samsung, LG phones, but should work on other Android phones.
Instructions:
Print all the required parts
Get all the non-3D printed parts
Assemble as per the photos – I’ll be writing some more detailed instructions on my website soon!
Install the Arduino code from the GitHub link in the description – You will need to update the Arduino pins in the code to match yours, and probably update the centering values for the servos.
Install the Android app from the link in the description.
Have fun!
If you hit any problems, please post a question on this website: [http://www.rapiro.com], here, or on YouTube channel. A few people have built RAPIRO now, so there are people around who can help.
Coming soon update!!
The open source Mobbob V2 software and hardware is free and made with love. Please show your level of support with a voluntary donation.
by ShotaIshiwatari is licensed under the Creative Commons – Public Domain Dedication license.
modified by Zalophus
on the command line, enter:
// #M1 – robot will move forward
// #M2 – robot will move backward
// #M3 – robot will turn right
// #M4 – robot will turn left
// #M5 – robot will raise his hand and wave the left hand. LED will become green and flashing
// #M6 – robot will lower his left hand. LED will become Yellow
// #M7 – robot will move both arm and contract his hands. LED will become Blue
// #M8 – robot will wave goodbye with his left arm. LED will become RED.
// #M9 – robot will raise its right arm and move its waist. LED will become BLUE
// #M0 – robot will go to initial position
CAPS LOCK is important when you input a command via the serial monitor..
Reading through the source code.
Each movement of the preset (# M1 ~ # M9), consists of pattern of 8 frames.
Each frame is defined values uint8_t type sixteen (motion).
This can be changed modifying the number of frame per pattern.MAXFN
Lets take #M0 for example:
I put numbers so you can visualy make sense of what a pattern is, and what a frame contain.
Movements consist of pattern. Pattern are made of frames. Each frame contrain the rotation angle of every servo, the values of the RGB LED and a Time to perform the action.
Head horizontal rotation angle (Head yaw) (left) 180 <—> 0 (right)
Hip horizontal rotation angle (Waist yaw) (left) 180 <—> 0 (right)
Right shoulder up and down angle (R Shoulder yaw) (bottom) 0 <—> 180 (above)
Open right shoulder angle (R Shoulder pitch) (closed) 90 <—> 180 (open)
Right hand opening and closing angle (R Hand grip) (closed) 50 <—> 110 (open)
Left shoulder up and down angle (L Shoulder yaw) (bottom) 180 <—> 0 (top)
Open left shoulder angle (L Shoulder pitch) (closed) 90 <-> 0 (open)
Left hand opening and closing angle (L Hand grip) (closed) 130 <—> 70 (open)
Right foot horizontal rotation angle (R Foot yaw) (left) 0 <—> 180 (right)
Twist angle of the right foot ankle (R Foot pitch) () 0 <—> 180 (outside)
Left foot horizontal rotation angle (L Foot yaw) (left) 0 <—> 180 (right)
Twist angle of the left foot ankle (R Foot pitch) (within) 180 <—> 0 (outside)
Red component of the eye (R) 0 <—> 255
Green component of the eye (G) 0 <—> 255
Blue component of the eye (B) 0 <—> 255
Here are some other helpful commands that can be used to control the LED and each servos individually.
LED CODE sample
// #PR000G255B000T010 – MAX GREEN COLOR
R,G,B values between 0 and 255
T is the time component to get to desired color
LIMBS MOVEMENT
Sxx refers to one of the 12 motors (from S00 to S11),
A000 up to A180 is the angle where to servo incline,
Txxx is the time to perform the movement.
you can combine two commands, i tried more but it didn’t work..
// #PS00A000T010#PS00A180T010 – full head movement from side to side
// #PS01A000T010#PS01A180T010 – Waist
// #PS02A000T010#PS02A180T010 – r Shoulder
// #PS03A050T010#PS03A180T010 – r Arm
// #PS04A030T010#PS04A140T010 – r HAND
// #PS05A000T010#PS05A180T010 – l Shoulder
// #PS06A130T010#PS06A010T010 – l Arm
// #PS07A030T010#PS07A180T010 – l hand
// #PS08A000T010#PS08A180T010 – r Foot yaw
// #PS09A000T010#PS09A180T010 – r Foot pitch
// #PS10A000T010#PS10A180T010 – l Foot yaw
// #PS11A000T010#PS11A180T010 – l Foot pitch
3D Design Tool: SketchUp Pro
Design concept: RAPIRO – The Humanoid Robot and Gundam
This is an remix version of my MobBob robot.
MobBob is a smart phone controlled robot. By harnessing the power of your smart phone, MobBob is a walking, talking robot with voice recognition and computer vision that you can build for around $20. I will be continuing to extend his features over time. I want MobBob to be a companion robot that everyone can afford and have fun with.
Support standard 9g servos [previously I was using Tower Pro SG90 servos]
Make everything easier to assemble [no more need for glue]
Make it easier to adapt/modify for other phones. The new bracket system made it easier to exchange a new phone / the battery holder.
Also, in my V2 Remix build, I’m also using the Arduino Nano instead of the DIY Nano shield, so the entire build is smaller and tidier. 🙂
MobBob V2 Remix uses the same software as the original MobBob V2.
You can find the latest Arduino code here: https://github.com/cevinius/MobBob
The modified code is included: MobBob2_Remix_Control_Bluetooth.ino
You can find more detailed build and wiring instructions here:
…coming soon…
The parts that you need to print:
1 x Leg Left
1 x Leg Right
1 x Foot Left………………………………Delete
1 x Foot Right…………………………….Delete
1 x Foot Cover Left……………………..Delete
1 x Foot Cover Right……………………Delete
1 x Foot Left Top
1 x Foot Right Top
1 x Foot Left Floor
1 x Foot Right Floor
1 x Waist
1 x Arduino Nano Holder
1 x Phone Mount Base
2 x Phone Mount Side
1 x Phone Mount Gear
1 x Phone Mount Back Plate
1 x Phone Mount Conn
2 x Phone Mount Bolt
2 x Phone Mount Nut
1 x Battery Bank Rack [18650 x 2]
1 x Battery Mount Cover
1 x Jacket Left
1 x Jacket Right
1 x Cap
The non-3D printed parts you need are:
4 x Tower Pro SG90 servos
1 x Arduino Nano ATmega328 [see note below]
1 x HM-10 BLE Bluetooth 4.0 CC2540 CC2541 Serial Wireless Module
1 x 5V Micro USB 1A Lithium Battery Charging Board [see note below]
1 x DC-DC Converter Step Up Boost Module 2-5V to 5V 1.2A
1 x Rectangle On/Off Long Rocker Switch SPST
2 x Snap-In Single ‘A’-‘AA’ Battery Contacts 209 [KEYSTONE ELECTRONICS CORP.]
2 x Snap-In Single ‘A’-‘AA’ Battery Contacts 228 [KEYSTONE ELECTRONICS CORP.]
2 x 18650 Lithium ion Batteries
1 x 300mm USB 2.0 A Male to Micro USB B 5pin + Mini B Male Y Splitter Cable
1 x Smart Phone [see note below]
4 x M3 5mm [for Foot Cover]
2 x M2 10mm [for Phone Connect]
4 x M2 5mm [for Phone Mount Back Plate]
2 x 2mm 5mm Tapping screw [for Foot servos]
2 x 2mm 8mm Tapping screw [for Hip servos]
2 x 1mm 5mm Tapping screw [for Foot servos hone]
2 x 1mm 8mm Tapping screw [for Hip servos hone]
2 x M3 15mm [for Jacket]
2 x M3 Nut [for Jacket]
4 x 2mm 15mm Tapping screw [for Jacket]
[Note: I got the servos, Arduino Nano, Bluetooth Module and Battery for under $30.]
Arduino Nano:
This is a small, Arduino compatible ATmega328 board with DIY extension board. MobBob V2 app connects to the Bluetooth module using its Bluetooth LE service. The app to support other Bluetooth cards.
Battery Extender:
You can use other batteries that provide 5V with a steady current. If you use other batteries, you may need to adapt the battery rack for your battery’s size.
Use 18650 Lithium Battery Charging Board With Protection Charger Module and Step Up Boost Module 3.7V to 5V for Smart Phone http://www.thingiverse.com/thing:1235749
Smart Phone:
You can use other Android Smart Phones with This app.
You do not need to adapt the size of the phone holder for your phone. The app has been successfully tested with Nexus and Samsung, LG phones, but should work on other Android phones.
Instructions:
Print all the required parts
Get all the non-3D printed parts
Assemble as per the photos – I’ll be writing some more detailed instructions on my website soon!
Install the Arduino code from the GitHub link in the description – You will need to update the Arduino pins in the code to match yours, and probably update the centering values for the servos.
Install the Android app from the link in the description.
Have fun!
If you hit any problems, please post a question on this website: [http://www.cevinius.com], here, or on YouTube channel. A few people have built MobBobs now, so there are people around who can help.
Coming soon update!!
Print Settings
Printer: PANDORA DXs – DIY 3D Printer
Slicer: Cura 15.04.2
Layer height (mm): 0.1
Shell thickness (mm): 0.8
Bottom/Top thickness (mm): 1.2
Fill Density (%): 00
Print speed (mm/s): 50
Print temperature: 200
Bed temperature: 70